

I put "smokeless" in quotes because all wood fires produce some smoke. You can, however, greatly minimize and even very nearly eliminate your fire's smoke signature, with some effort.
One good way to do this is by using a Dakota fire hole. There are many variations on this method, but I'll demonstrate here the one I like best. You will need to dig a hole that is just over a foot deep, and no wider than that in diameter. The pit can be widened at the bottom to allow for longer pieces of wood. Then dig a small tunnel beginning a foot or so from the main pit and angling down to the bottom of it. This will allow additional air to be drawn through and help the fire to burn hotter and more efficiently, producing less smoke.
If you can, put the air tunnel on the side of the pit from which the prevailing winds in the area come, as this will help to fan the fire. Even this is not possible because of terrain limitations (as it was not for this demonstration) the setup should work quite well.
For your fire, start with very dry wood, preferably long-dead branches, still attached to the tree, which have been protected from moisture by the boughs above them. Remove all bark, as most barks do not burn completely and tend to smoke, and split your kindling very finely. I put three rocks down in the pit to build the fire on top of, so they can heat for later use (cooking or keeping in pockets, etc, for warmth) after fire is out.

All set up and ready to strike. This is split aspen wood from a standing dead tree, along with a small amount of juniper. I added a bit of milkweed down, surrounded by a wad of shredded juniper bark, to catch the spark. It is difficult to see in this photo, but there is a shallow trench in the bottom of the firepit (that the rocks are in) which lines up with the air tunnel. This both helps to draw air through, and allows you to place wood flat on the bottom of the pit, while still allowing air under it.
The hole is approximately twelve inches in diameter, widened out around the bottom to accept larger pieces of wood. By keeping it small at the top, you maximize efficiency and also make it easier to quickly cover the hole with a flat rock, if you have a sudden need to eliminate the fire and reduce your heat signature...

Fire took on the first strike, using a firesteel and length of old dulled hacksaw blade. This is the most smoke it ever produced, and that only for a moment, until it began drawing air through the tunnel.

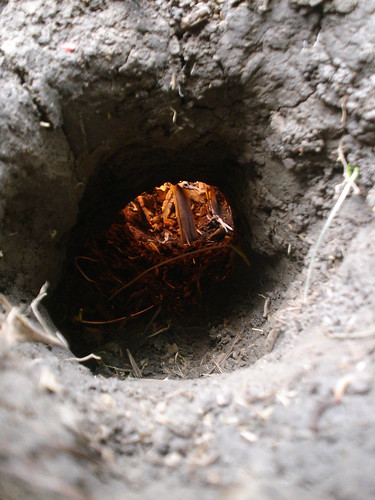
Looking in through air tunnel:


Does the dirt in the top of the tunnel ever collapse from being too dry? And would the tunnel work with sand, do you think?
ReplyDeleteI've never had it collapse, as it is down fairly deep beneath the surface for most of its distance, but that might be a concern with some soil types. Sand does not work too well. The structure of both the tunnel and the pit are difficult to maintain in sandy soil. A better alternative in sand is to dig a slightly shallower pit, then make an open-topped trench or two in the sand leading to and from the pit to help increase airflow, covering the trenches with flat rocks, tree bark or whatever is available.
ReplyDelete